
Making a Cob Mix for an Earth Oven
This article accompanies our other journal entry about how to make an earthen oven and is an abridged version of the guide that appears in our book Building with Cob.
There are many different ways to mix up cob. The following is one way that you can make a cob mix simply, without the need for special equipment, that will work for a bread and pizza oven.
Ingredients
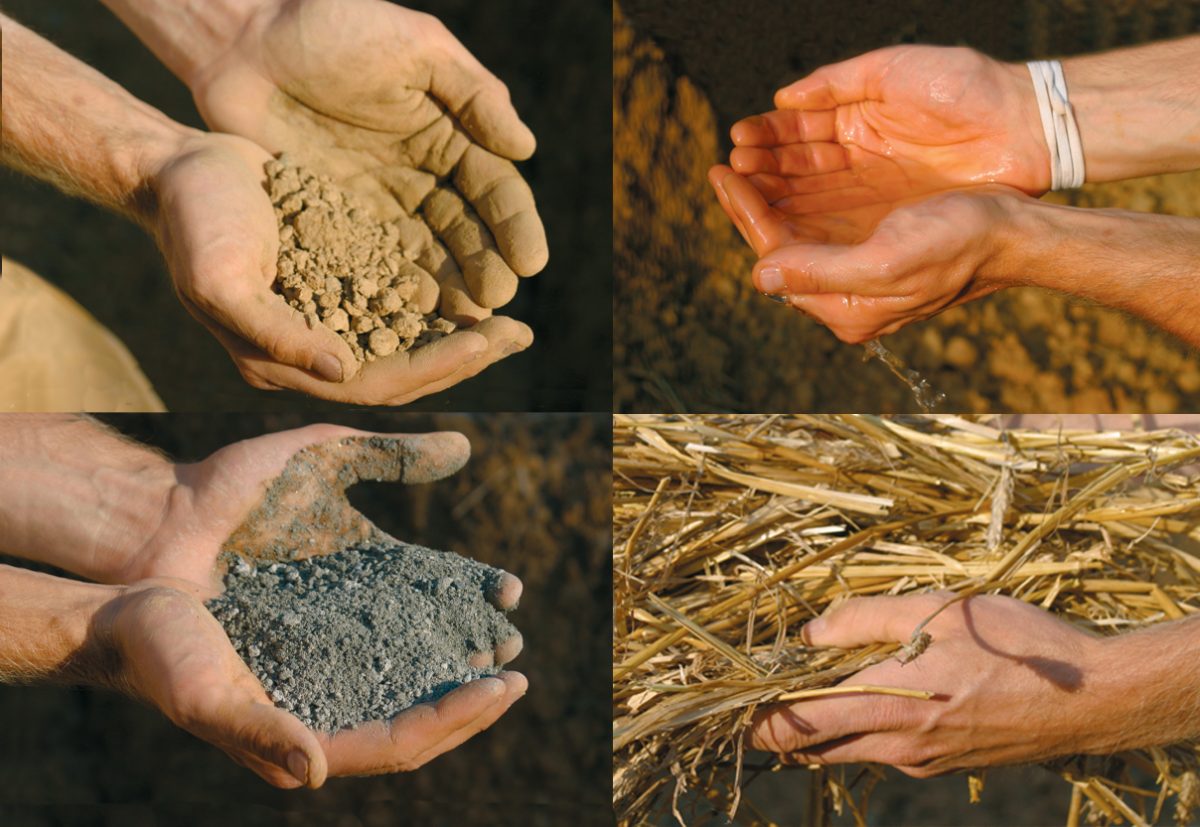
To make a good cob mix you must have good ingredients. Our four basic ingredients are:
1. A suitable clay sub-soil
2. An aggregate/sand
3. Fibre- fresh straw (not hay)
4. Water
These materials can all be found in abundance throughout the UK and you should try and source them as locally as possible to avoid unnecessary transportation, and to create a sense of satisfaction that your building is being created from the elements of the land around you.
The function of each material within the mix are as follows:
Clay sub-soil
The function of the clay is as a binder to hold the aggregate particles together. Clay holds this aggregate mechanically, via suction. It must be initially made wet to coat the aggregates. Clay expands when wet and contracts when dry, and hence needs the addition of the fibres and aggregate to make it more stable, and to prevent serious cracking which could produce a weakness in the wall. This is why your proportions of aggregate to clay should be in the realm of 80% aggregate to 20% clay. Remember that you may find naturally occurring aggregate in your clay sub soil, and may therefore not need to add any to the mix. With this in mind it should help you to reframe the notion of clay being the predominant ingredient of cob. It is not. The aggregate is your main ingredient and the clay simply acts like a mortar between bricks holding the aggregate in one unified mass.
Aggregates
The purpose of the aggregate is to stabilise the clay. The best cob is made by having a range of individual particle sizes, from fist-sized stone to gravel (minus to grit) and sand to fine silts that are found naturally in the clay. Like a good mortar mix, the more sharp and angular the particles are, the better the results will be.
This ensures that the particles lock together and hence create a good bond, as opposed to rounded particles like beach sand, which will not.
Never use beach sand, the particle sizes are rounded and would be paramount to trying to stack a pile of tennis balls.
Fibres
Traditionally people have used all sorts of different fibre that they have had to hand, such as heather, rushes and flax. The best fibre is fresh, strong, and long straw. Oat, wheat and rye are the best options. It must be either very fresh or have been well stored, away from moisture. Do not use straw that has got wet and begun to rot; its function within the wall will be futile. You need strong straw that is not brittle and does not break easily.
The purpose of the fibre is many-fold. Firstly it gives tensile and sheer strength to the wall, acting as a natural rebar. This allows the cob wall to move slightly and therefore withstand ground settlement and natural movement within the building. Secondly, it prevents major cracking by spreading out the cracks as hairline fractures, thus preventing the development of larger, structural cracks within the wall. Thirdly, it can soak up excess water during the mixing process. Finally, it adds insulation to a cob wall by trapping air in its hollow stems.
The straw will not rot inside the wall because there is little oxygen or moisture available once the wall has dried out. We have pulled apart cob walls that are a couple of hundred years old and found much of the fibre to be intact. The best way to get straw is to source it direct from a local farmer or from a farm supply store.
Water
The addition of water to the above ingredients will transform the clay, straw and aggregate into the thick, sticky, homogenous paste that is going to make up the cob. The binder, the clay, must initially be made wet to coat the aggregate particles to create the suction that sticks it all together.
Too much water and the clay element becomes unmanageable, too little, and the adequate bonding will not take place and a homogenous mixing of all the ingredients will not be achieved. This will be clarified later.
The above information on ingredients will help you to make the best cob you can. There have been times when due to circumstances we have made cob using poor ingredients- any old sand we had to hand and even wet straw, and we were still able to make a totally adequate cob mix. Our point being, that we want to lessen your anxiety about having to have everything absolutely perfect; Cob is a very flexible and forgiving material. It is like making a loaf of bread- you can use poorer quality ingredients and still come up with something that looks and tastes like bread, it just may not be the best bread you have ever tasted!
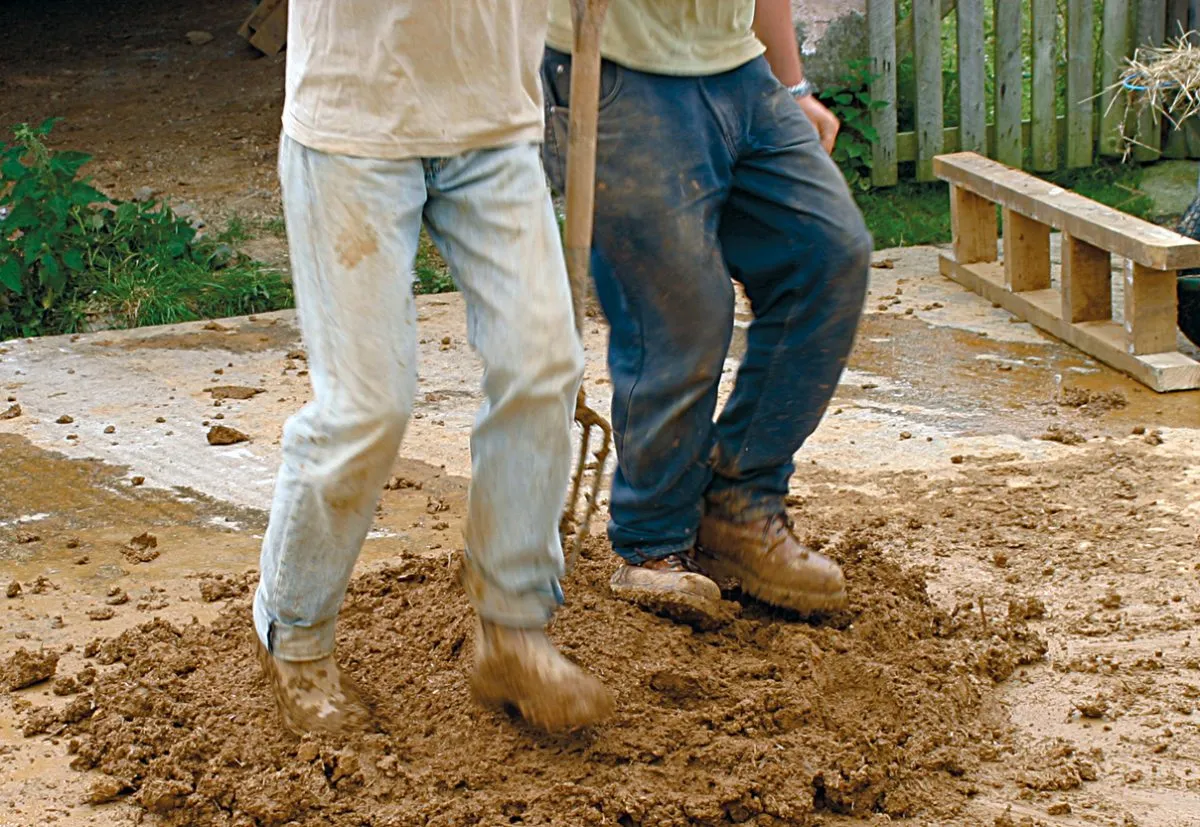
Mixing the cob by foot
There are several methods to make cob that involve the use of equipment and more than one pair of hands. We explore all of these in our book, but for this purpose we have focused only on the simplest method that can be done in solitary isolation!
You will need:
1. Shovels and forks for turning cob over.
2. A water source with hose.
3. A plywood or concrete base that is relatively flat. This must be sprayed down with water before you begin.
4. Place your clay subsoil and aggregate in a pile and wet down. As a guideline refer back to the 80/ 20 aggregate to clay rule.
5. Stomp the material and then turn with a shovel until mixed thoroughly.
6. Grab a few handfuls of straw and sprinkle evenly across the surface of the cob. Dive in and stomp vigorously until the all the straw has been smeared by cob. Turn the mix over again and stomp the mix flat. Add more straw and do the same as above. A good ratio of straw to clay and aggregate is one five-gallon bucket of straw compressed, to five buckets of dry ingredients. Keep repeating this process until the straw is used up, constantly turning and stomping, until all the straw is thoroughly mixed in and is the same color as the cob. Add straw until the mix can take no more.. Turn and tread again until ready. This method is very effective, but we have found it can be really hard on your back and quite a grind to make large mixes.
How to know when your mix is ready
On the whole, it should be thoroughly mixed and you should not see any dry bits or be able to distinguish any aggregate/sand within the mix. Similarly, the straw should be thoroughly incorporated and well dirtied by the clay. It should not be sloppy, nor too stiff. It should hold its form well. Grab a large handful, and with a partner try to rip the cob apart. If it is hard to do this, you know that you have enough straw in it, and that the straw will be able to serve the purposes for which it is intended.
“Traditionally, mixing was a process to be learned, with judgment developing out of working directly with the wet material, since the nature and requirements of the particular soil being prepared become apparent as mixing proceeds. As no two soils are identical in their constituents, so each mixing will vary slightly from the next. Variation will be in the amount of water and fibre needed and possibly in the need to add extra aggregate. In these circumstances taking things gradually by adding water and fibre by degrees makes common sense and is the recommended practice for those starting to learn the techniques. Once the basic management of the material is understood through experience, then shortcuts can be considered.”
Harrison, Ray. Bowhill, English Heritage Research Transactions.