There can be nothing more rewarding and relaxing than taking on a new challenge in the garden. One that involves hard work, escapism, creativity, trial, error and, one that includes the whole family. It’s a challenge that involves creating a sense of something. Something of lasting use and beauty connected to the earth and entirely natural. Therefore we have extracted from our book, Building with Cob, the principle guidelines for making an earth oven. The creation of an earthen bread oven makes for a beautiful, and self contained, simple starter project for anyone who wants to get used to working with earth.
Please check with your local authority about any smoke control legislation.
History
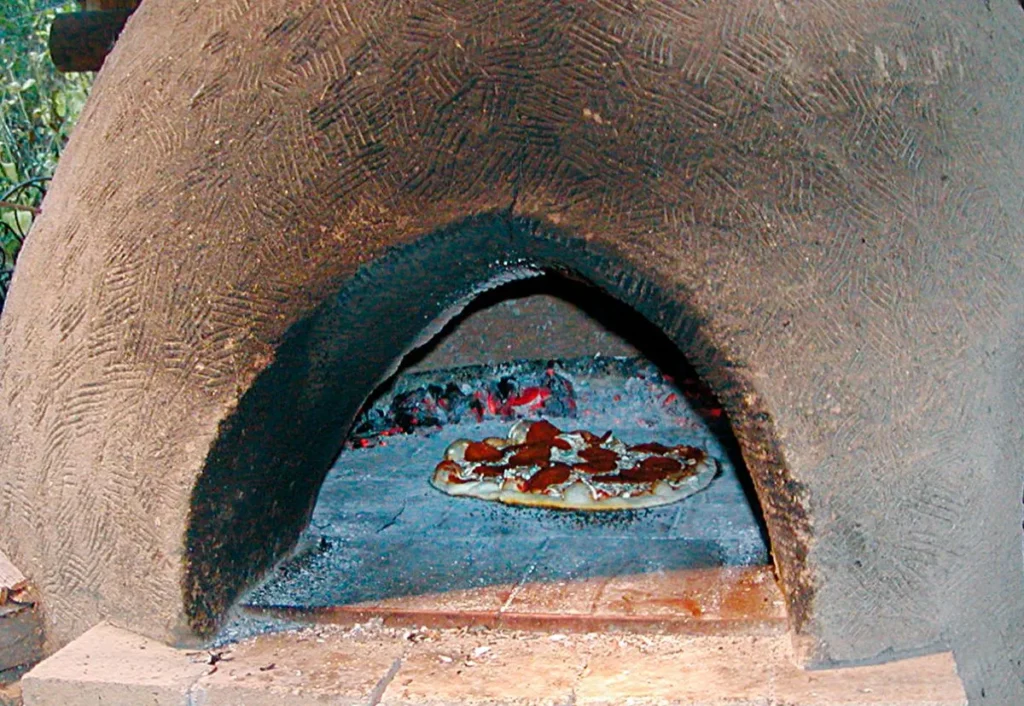
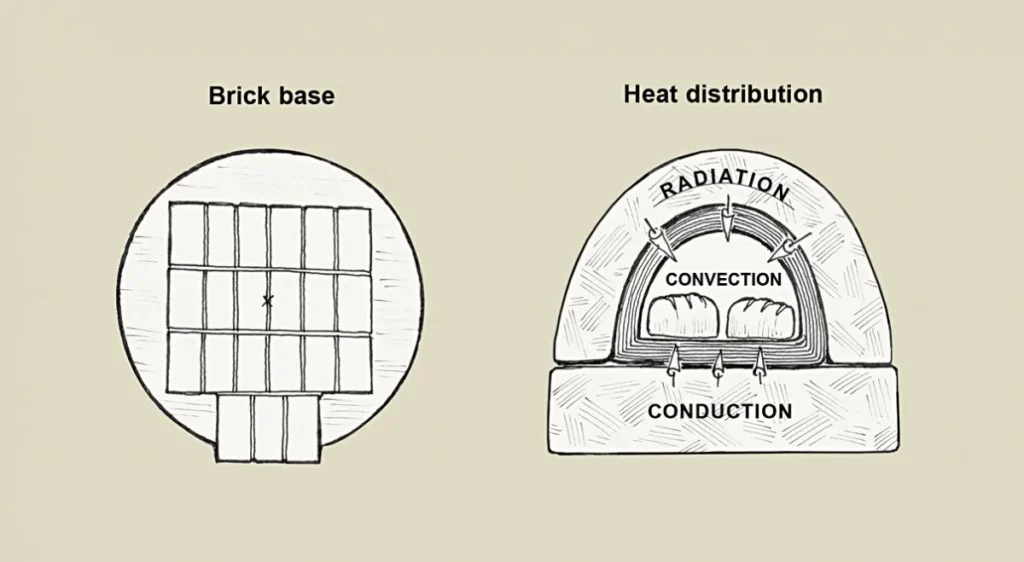
Clay bread ovens go back to 4,000 BC when our ancestors designed a simple dome-shaped, wood-fired, earth oven with the specific intention of baking bread. This design was faultless and will bake a much better loaf than a modern oven because it uses all forms of heat: convection from the hot rising air, conduction from the contact of the bread dough on the hot fire brick floor, and radiant heat evenly being released from the surrounding earthen dome walls, which have stored heat from the fire burning within.
The dome shaped oven is fashioned out of cob, which sits on a foundation plinth at a height that is comfortable for the baker to work at.
The oven floor is made out of firebricks, onto which a fire is laid from thin pieces of quick burning, dry wood. The simplest oven is created with a single opening at the front specifically calculated relative to the oven size. This opening remains open when the fire is burning – acting as a passage through which air is drawn to feed the flame, and from which any residual smoke can exit.
The incoming cold air organises itself below the exiting warm air and smoke. As the fire burns, it will heat up the fire brick floor it is in contact with, from the hot coals created, and the earthen dome around it. The fire brick and earth both have excellent thermal mass enabling them to absorb and store this heat until the fire is gone.
When the inside oven space has reached its maximum temperature of around 700 degrees farenheit, which can take from 1-3 hours depending on the size of the oven, the fire remains and hot coals are raked out into a metal container. The oven floor is then wiped with a damp cloth, the oven door closed and the oven left to sit for up to half an hour for the temperature to even out inside and to come down to the necessary baking temperature of 450 degrees farenheit. The bread dough is then placed directly onto the oven floor and allowed to cook evenly and deliciously into a crusty loaf. The oven will gradually decrease in temperature over a period of the next six hours as it relinquishes its stored heat
This allows for the versatility of cooking a range of different foods requiring different temperatures. Utilising these different temperatures is the equivalent to turning your knob on your oven, but a lot less mechanical and a lot more sensory – it involves the beginning of a relationship between mud, fire, and your food. At it’s hottest you can bake pizza quickly for never more than three minutes. At around 450 degrees it is perfect for bread, and then as it gets cooler, you can bake roasts, pies, potatoes, vegetables and more.
Siting the oven
Choose a spot that is not too exposed to the prevailing winds and face the oven away from the prevailing wind. Ensure the oven is a safe distance from flammable materials as there will often be sparks.
The oven must have a protective roof covering, otherwise it will wash away after the first season of rain, as well as making it unpleasant for the baker on rainy days. This can be a simple, free standing wood structure with a sloping mono-pitch roof, or a lean-to at the side of a house.
The oven design
The actual oven is made up of two layers of differing cob mixes – a no straw mix for the first thermal layer, a normal cob mix for the second layer, and a breathable plaster finish which is best made out of sand and earth, or just cow dung. These are shaped around a damp sand form in the shape of a dome, which is later removed once the cob has dried sufficiently and is able to hold its form.

Dimensions
A good standard size that starts with a 690mm oven floor. Considering that the thermal layer should be about 80mm, the second layer from 130 – 150m, and the final plaster up to 50mm, you will end up with a total oven diameter of up to 1250mm in total.
- The total diameter of the stone foundation should be slightly larger than the total diameter of the oven.
- The height of the oven void and therefore the damp sand form should be slightly larger than the radius of the oven floor, so the above sized oven example shown in the diagram, with a radius of 340mm should have an actual height between 430 – 500mm works well. If your void is smaller than this the fire will not burn as not enough air will be able to enter, and higher than this, you will get cold pockets in the upper reaches of the void – both contributing to less than ideal baking results.
- The opening at the front of the oven onto which the door is fitted should be 63% of the dome height. This is a standard and crucial measurement for optimum combustion of the fire within the oven.
The building process
Foundations
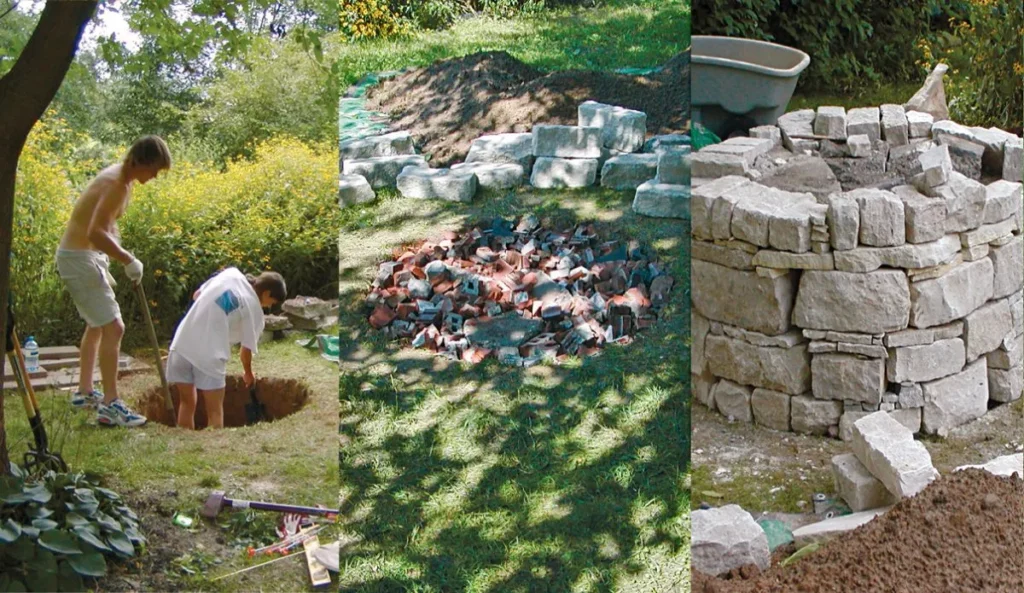
Dig a hole slightly larger than the total diameter of the oven, roughly 18 inches deep. If you live in an area where the ground is frozen for half the year, find out where the frost line is and dig down to this level. This will prevent the oven from shifting about and buckling with the frost heave.
Avoided building on ground that is prone to getting sodden during heavy rain.
Ensure that the bottom of the hole is solid and compact. If not, tamp with a tamper or large round pole.
Fill this hole to 25mm below ground level with rubble or drain rock about 80mm in diameter, and compact. This will prevent any ground moisture from migrating up into the oven base and damaging the cob. On top of the drain rock begin to build the foundation plinth in stone or brick. It is only necessary to build a stone or brick face with a rubble stone infill. The stacked stone or brick should be at least 300mm (12 inches) wide, and all normal stone/bricklaying principles apply – most importantly that no vertical joints occur between different courses. You can use a cob, or lime mortar in between the stones to stabilise them. Remember that the mud oven is heavy, and the main job of the foundation plinth is to support this weight, so the plinth must be solid.
The foundation plinth can be at any height as long as it is at least one foot off the ground to protect the cob from moisture.
Lay sand base for the firebricks. This should consist of normal builders sand about 6 inches deep to help hold the heat in the oven floor and prevent it from being lost into the ground. This should come level with the top of the foundation ring. On top of this, spread a half inch layer of fine silica sand which should be extended half an inch above the stone ring around the door area where the firebrick will overhang the foundation slightly. Make a smooth bed, which should be level at all points to prepare for the bricks.
The firebricks must be laid from a central point so that the floor is set evenly within the oven for even baking. You will need 21 bricks, which will be laid in a square with a tongue at the area where the opening will be placed. Mark the centre of the oven floor. Lay the first 2 bricks either side of this central point and then build the others around them.
The bricks should be very tightly fitted against one another. As you lower each new brick into place, make contact with its neighbour and slowly slide it down into place. Use a rubber mallet to gently tamp the bricks firmly into the sand without disturbing the other bricks.
The brick floor must be level with no jutting edges.
To mark the circumference of the sand dome on the firebricks, draw a circle reaching to the farthest edges of the bricks. Find your central point in the square and attach a piece of string to a pencil. The piece of string must be the length of the radius of the circle (half the diameter).

Start with a pile of damp sand in the centre of the circle building up and out so that the edges of the sand form stop at the edge of your pencil marking, so that only the corners of the bricks are visible.
Build the walls almost vertically at first to create enough space within the oven, espe-cially at the edges, for the bread dough to rise unhampered. At about 115mm begin to curve the sand in to create a dome, and build up to height 495mm.
Use your hands or a piece of flat wood to make your dome compact and smooth – like building a sandcastle. Start with the sand slightly on the dry side, as it is easier to spray it with more water if required.
While the sand dome is still damp, cover it with damp newspaper so that when you are digging out the sand you will know when you have hit the beginning of the cob walls.
Make up two separate batches of cob – one without straw for the thermal layer, and one with straw for the second layer.
Mark out on the foundation base the 75mm needed for the thermal layer, and the 150mm for the second layer to guide you.
With handfuls of fairly stiff cob, compress it in place starting at the base of the sand form. The cob should be pressed into itself and not into the sand form; otherwise it will damage the form, causing it to lose its shape.
The dome must be covered in one go to avoid joins and thus weak spots in the oven structure. When completely covered, do not slap the cob with your hands, as it will weaken it, but rather use a flat board to compact it, gently rocking it over the cob until it is firm and smooth. With a fork or plastering scratch tool, score the surface to create a key for the next layer.
The next layer of cob (with straw) can be applied immediately. It it is not, dampen the first layer before applying the second layer to ensure good bonding. Apply the second layer in exactly the same way as the first, leaving a scored surface to key in the plaster layer.
Cut out the door and extract the sand. Measure out the door height and width (height = 63% of the total dome height ie 500mm x 0.63 = 315mm The width should be wide enough to be able to fit loaf tins and pizzas, but not so wide that too much heat is lost.
We recommend a width of about 500mm. Wait till the cob feels firm to the touch before carving out the door hole. Scratch the outline of the door measurement with a metal tool – a dull knife or trowel – and then slice through the cob layers to create the opening.
Begin pulling out the sand. Use a flashlight to see the farthest reaches, and to see when you have hit the newspaper, which should be peeled off the cob and removed.
As with all earthen structures, the oven must be covered with a breathable plaster. This is especially pertinent with the oven, as it will need to release the steam created from the heat of the fire. A lime plaster can be used, and is recommended if the oven is exposed to the weather, but we prefer to use something less processed, so as to retain the muddy tones of the cob, and to remind us that it is built of the earth around us – dug up from our back garden or an adjoining field.
An earthen plaster seems the most appropriate option and the most fun.

The oven needs to dry for at least a few days before laying the first fire, to ensure that the intense heat does not create cracking in the cob.
A nice way to christen your oven, and to be able to appreciate the magical inner dome that you have created out of mud, is to light a candle inside the structure. Watch the flame dance on the mud.
The door
The door should be made out of wood to fit snugly into the opening. A handle makes it easy to put in place and to remove. It does not need to be hinged in place.
The oven and smoking
The oven may smoke a little which is all part of the process. Because it does not have a chimney, the fire may not burn as efficiently as it should. This may only happen as you are getting the fire going and the oven is cold. As long as dry wood is used and the fire burns well, smoke should be kept to a minimum. This is why it should not be enclosed in a building, and why the oven door should be placed away from the prevailing wind.
A few tips on how to lay the fire & use your earth oven
This takes practice and experience, but there are a few guidelines that can get you on your way:
1. Use dry, thin, soft or hardwood.
2. The wood will burn best if it is stacked loosely to allow lots of air to fuel the flames.
3. Build the fire at the front of the oven first, and gradually push it back over the course of the firing.
4. Allow the fire to burn for at least 30 minutes with the door open and then feed it with some more wood – to encourage a good burn.
5. Allow to burn from 1-3 hours until the oven reaches its maximum temperature of around 700 degrees farenheit. Leave a bakers temperature gauge in the oven which will be able to record higher temperatures when reached.
6. Just before the oven reaches its peak temperature, spread the coals and embers across the whole floor of the oven to heat the firebricks evenly, as most of the heat will have been concentrated under the fire in the centre of the oven.
7. When ready, rake out the remains of the fire into a metal bucket. Sweep the firebrick floor or wipe with a damp cloth so that you don’t get soot or grit in your bread.
8. Shut the door, and allow the heat to even out and really soak into the structure – about a half an hour is good. If baking pizza, however, cook immediately after the fire has been raked out as they cook best in very hot temperatures.
9. Monitor the temperature gauge and set in the dough quickly as soon as it lowers to 450 degrees farenheit. Shut the door immediately to prevent heat loss. The bread cooking time will vary due to your recipe but should be ready from between 20-60 minutes.
The baking process using an earthen oven is an almost full day affair, which can be turned into a ritual, and an event in itself. It truly produces ‘slow-food’, which tastes wonderful, and is much needed in today’s hectic and fast world.